


How to Open and Manage Tickets
Overview of Support
Two types of Support Tickets are envisaged: for the Personal Area, or for the Virtual Infrastructure Area.
Please note that the Virtual Infrastructure Area is created and accessible only after the Wallet creation.
Personal Area
The Support for the Personal Area of the ONDA User Portal is accessed in one of the following 2 ways:
- from the Personal Area button at Login (identified with your Firstname Lastname) under ONDA Support
- from the Virtual Infrastructure Area, click menu > Homepage then select Personal Area
Virtual Infrastructure Area
The Support for the Virtual Infrastructure Area of the ONDA User Portal is accessed in one of the following 2 ways:
- from the Virtual Infrastructure Area button at Login (identified as Virtual Servers – your Wallet name), then from the menu, click Support > Virtual Servers
- if you are in the Personal Area (and have already created a Wallet), from the menu click Homepage then select Virtual Servers.
Open a Ticket
- From the Support page of either the Personal Area or the Virtual Infrastructure Area, click the New button on the top right corner of the Tickets list table:

- Fill in the mandatory information from each of the tabs, as follows.
Step 1 – Ticket Information
- Ticket Type (mandatory): select the most appropriate option from the drop down menu:
- New resource access needs
(Select this option if you wish to extend your Virtual Server(s) needs) - Resource access anomaly
- Something is not working as expected
- Support request
- New resource access needs
- Impact (mandatory): select the most appropriate option from the drop down menu:
- I need support to continue my task
(Select this option if the issue only impacts one user) - Less than 100 users need support to continue their activities
(Select this option if the issue impacts more than 1 and less than 100 users) - More than 100 users need support to continue their activities
(Select this option if the issue impacts more than 100 users)
- I need support to continue my task
- Title (mandatory): provide a title for your Support Request
- Description (mandatory): provide a detailed description for your issue or query
- Click the Next button to move to the next tab (Step 2)
Step 2 – Ticket Categorization
Select the option that categorizes your issue.
Tick the “Generic” box if you do not know the category.
- Generic
- Generic
- Generic request
- Generic anomaly
- Generic
- Billing
- Hourly consumption
- Generic request
- Generic anomaly
- Generic billing
- Billing request
- Billing anomaly
- Hourly consumption
- Invoicing
- Generic invoicing
- Invoicing request
- Invoicing anomaly
- Generic invoicing
- Privacy and personal data
- Generic privacy
- Generic privacy request
- Terms and condition
- Generic terms and condition request
- Generic privacy
- Software and tools
- Generic software
- Generic software request
- Operating system
- Application anomaly
- Onda-dias application
- Application request
- Application anomaly
- Generic software
- Virtual infrastructure
- Security
- Security anomaly
- Security request
- Network
- network anomaly
- network request
- Virtual server
- Virtual server anomaly
- Virtual server request
- Security
Click the Next button to move to the next tab (Step 3)
Step 3 – Attachments
- Click the Select button to upload one or more attachments
- The name of the attachment will be displayed in the File name column
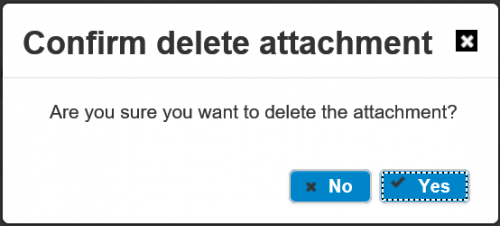
- After uploading, you can delete any of the attachments by clicking the Remove link in the Action column
- Confirm you want to proceed with deletion by clicking Yes on the pop-up window
- Click the Next button to move to the next tab (Step 4)
Step 4 – Summary
- Review the information inserted for your Support Request.
You can go back and edit any of the tabs by clicking the Back - Click Save
View Tickets List
- Click Menu on the top left corner > Support > Tickets List
The Tickets List view opens up

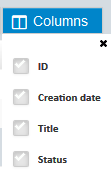
- From the Tickets List view, you are able to view the following information for each opened ticket:
- ID: unique identification number automatically assigned to your ticket
- Creation date
- Title
- Status
- Sort any of the columns in A-Z order by clicking on the arrows next to the columns names, e.g. by Status or Creation date
- Hide any of the columns by clicking the Columns button on the top right corner of the list
- Display 5, 10 or 15 tickets per page by selecting the number at the bottom of the list table

- Create a new Support Request by clicking the New button on the top right corner of the list

View a single Ticket
View the details of any opened Ticket by clicking the Ticket ID number from the Tickets List view.
Manage a Ticket
Click the Ticket ID number from the Tickets List and:
- Update the Attachments list as follows:
- Click Remove to delete an existing attachment
- Click the Select button to add an Attachment
- Add information to an open Ticket:
Click the Work info button
![]()
- Add a Work info message
- Click the Save button
- The Work info is now saved and displayed on the Ticket View page